Welcome to the new frontier of internet connectivity. For years, reliable high-speed internet was a luxury many in rural or underserved areas could only dream of. Then came Starlink. Developed by SpaceX, Starlink is a groundbreaking satellite internet constellation designed to bridge this digital divide, offering speeds and latency far superior to traditional geostationary satellite systems.
This Starlink Installation, Setup & Equipment Guide is your ultimate resource for understanding, acquiring, and setting up your Starlink system at home. Whether you’re cutting the cord, moving off-grid, or simply seeking a faster, more reliable connection, we’ll walk you through every step, ensuring you get the most out of this revolutionary technology.
At a Glance: Your Starlink Essentials
- What it is: A constellation of thousands of Low Earth Orbit (LEO) satellites providing high-speed, low-latency internet globally.
- Key Equipment: The Starlink Kit includes the "Dishy McFlatface" antenna, a Wi-Fi router, cables, and a basic base.
- Installation Highlight: The most critical step is ensuring a clear, unobstructed view of the sky for your Dishy. The Starlink app is essential for this.
- Performance: Expect typical download speeds of 50-250 Mbps and latency of 20-40ms, comparable to good DSL or cable.
- Pros: High speed, low latency, global potential, relative ease of setup, improving service.
- Cons: Significant upfront hardware cost, strict line-of-sight requirement, evolving customer support.
Understanding Your Starlink System: The Basics
Before you even think about drilling holes or climbing ladders, it helps to understand what makes Starlink tick. Unlike older satellite internet that relies on a few large satellites high in geostationary orbit (36,000 km up), Starlink uses thousands of smaller satellites in Low Earth Orbit (LEO), circling the Earth at a mere 550 kilometers. This much closer proximity is key to its impressive speed and dramatically lower latency.
Here's a simplified look at how it all comes together:
- LEO Satellites: These are the workhorses, constantly moving overhead, communicating with your user terminal and ground stations.
- Ground Stations (Gateways): Large antennas on Earth that connect the Starlink satellites to the terrestrial internet backbone. Think of them as the bridge between space and land.
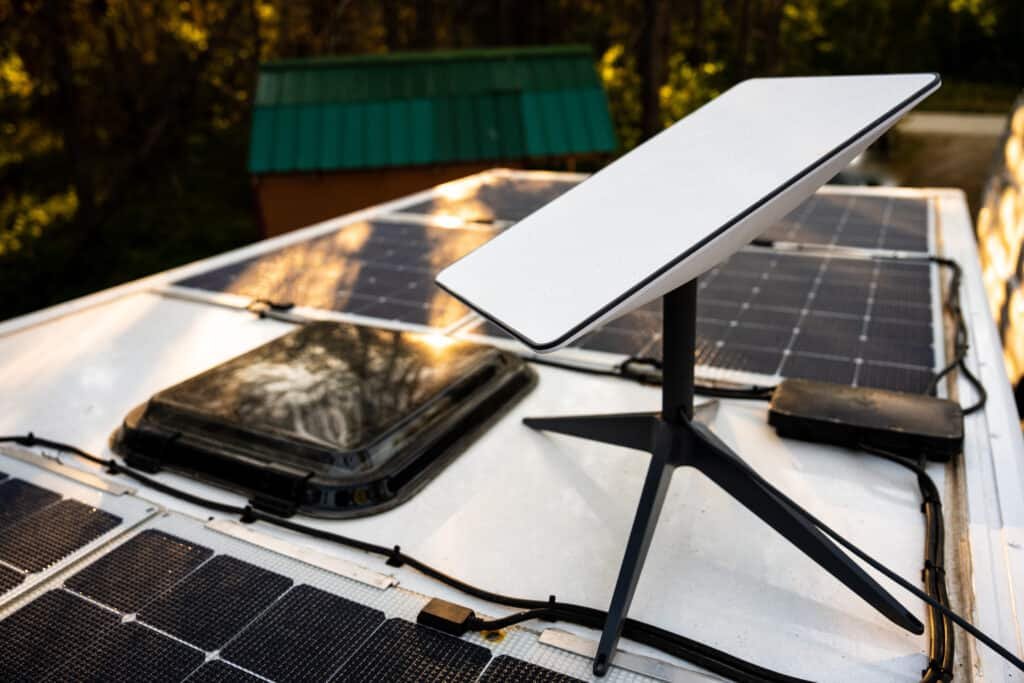
- User Terminals ("Dishy McFlatface"): This is your main piece of hardware – a rectangular, phased-array antenna that automatically aligns itself to track the LEO satellites, ensuring a continuous connection. It's surprisingly smart!
Why is this important? Because understanding the "clear view of the sky" requirement will make much more sense when you know your Dishy is constantly trying to "see" and connect with multiple fast-moving satellites.
Before You Order: Availability & Planning Ahead
Your Starlink journey begins online, long before any equipment arrives at your door.
Checking Starlink Service Availability
Starlink service is structured around "cells," which are specific geographic areas. Availability hinges on the number of active satellites and the capacity of ground stations in your region.
- Visit the Official Starlink Website: Go to Starlink.com.
- Enter Your Service Address: Be precise! Your registered service address is crucial. Moving outside your registered cell can degrade or even eliminate service.
- Check Availability Status:
- Available Immediately: Great news! You can proceed with your order.
- Waitlist/Pre-order: You'll typically pay a refundable deposit and receive an estimated fulfillment date. This could be weeks, months, or even over a year, depending on your region's capacity.
- Not Yet Available: You can register for email notifications when service becomes an option in your area.
Pro Tip: Availability is constantly expanding across North America, Europe, Australia, and many other regions. Always check the official website for the most current coverage map.
Starlink Plans & Pricing
Starlink offers several service tiers, each with different features and costs:
- Residential: The standard plan for fixed locations like your home. It offers prioritized service at your registered address.
- Roam (formerly RV): Designed for travelers or temporary locations. While portable, service is lower priority during network congestion, meaning speeds can dip in busy areas.
- Business/Priority: For businesses and high-demand users, offering higher speeds, lower latency, and network prioritization. This often comes with a larger dish and higher monthly fees.
- Maritime/Mobility: Tailored for use on boats or moving vehicles, requiring specialized hardware and a higher service cost.
Cost Considerations: There's a significant upfront cost for the Starlink Kit (Dishy, router, cables, basic base) and then a recurring monthly subscription fee. Prices vary by region and plan, so always verify the latest figures on the Starlink website.
What's Included in Your Starlink Kit?
When your Starlink Kit arrives, here's what you can expect to find inside:
- Starlink Antenna ("Dishy McFlatface"): The motorized, self-orienting dish.
- Starlink Wi-Fi Router: Creates your home Wi-Fi network. On newer models, the power supply is integrated into the router.
- Power Supply: (May be integrated into the router on newer versions).
- Starlink Cable: A thick, weatherproof, proprietary cable that connects Dishy to the router. The standard length is typically 75 feet (23 meters).
- Basic Base: A cross-shaped stand for initial setup and ground placement.
Performance Expectations: What to Anticipate
Starlink's performance is generally excellent for satellite internet, but it's important to set realistic expectations.
Typical Speeds & Latency
- Download Speeds (Residential): Expect a range of 50 Mbps to 250 Mbps. These speeds can fluctuate based on network congestion, time of day, and environmental factors.
- Upload Speeds: Typically 5 Mbps to 20 Mbps.
- Latency: Generally 20ms to 40ms. This is a game-changer for satellite internet, making Starlink comparable to a good DSL or cable connection and suitable for real-time applications like video calls and online gaming.
Factors Affecting Performance
- Obstructions: This is the #1 killer of Starlink performance. Any physical blockage – trees, buildings, even power lines – in Dishy's clear view of the sky will lead to service interruptions.
- Network Congestion: Like any internet service, speeds can decrease during peak usage hours or in densely populated Starlink cells.
- Weather: While Dishy has a built-in heater to melt snow and ice, extremely heavy rain, dense clouds, or severe snowstorms can cause minor signal degradation, known as "rain fade."
Starlink's Trade-Offs: Pros and Cons
Like any technology, Starlink isn't a silver bullet. Understanding its strengths and weaknesses will help you decide if it's the right fit for you.
The Upsides (Pros)
- High Speed & Low Latency: A dramatic improvement over traditional satellite internet, making modern online activities feasible in remote areas.
- Global Potential: Gradually expanding to cover most of the globe, connecting previously underserved communities.
- Relatively Easy Setup: Designed for DIY installation, thanks to its self-orienting dish and intuitive app.
- Portability (with Roam plan): Offers flexibility for those who travel or need temporary internet solutions.
- Continual Improvement: As more satellites launch and technology evolves, performance and coverage are steadily improving.
The Downsides (Cons)
- Significant Upfront Cost: The initial hardware purchase can be a barrier for some.
- Strict Obstruction Requirements: The absolute necessity of a clear line of sight can be a challenge for properties with tall trees or buildings.
- Evolving Service: As a relatively new and growing service, Starlink is still refining its network and infrastructure.
- Customer Support: Primarily app/ticket-based, which can sometimes be slower than traditional phone support.
- Power Consumption: Dishy consumes more power than a typical modem/router, especially when heating to melt snow.
Your Step-by-Step Starlink Installation Journey
Now that you're well-versed in Starlink's fundamentals, let's dive into the practical steps of getting it up and running at your home.
1. Checking Availability & Ordering Your Kit
We covered this in detail earlier, but it bears repeating:
- Visit the official Starlink website and accurately enter your service address.
- Confirm availability and select your desired service plan (Residential is usually the default for home use).
- Complete your order, make your payment, and wait for shipping confirmation and a tracking number.
2. Unboxing & Getting Acquainted with Your Gear
Once your Starlink Kit arrives, handle it with care.
- Careful Unboxing: Open the box and carefully inspect all components against the packing list. Ensure nothing is damaged or missing.
- Understand the Components:
- Dishy (Starlink Antenna): The star of the show, motorized and self-aligning.
- Starlink Wi-Fi Router: Creates your home Wi-Fi network. On newer models, the power supply is integrated into the router, simplifying the setup.
- Starlink Cable: The thick, proprietary cable connecting Dishy to the router.
- Basic Base: The simple cross-shaped stand for initial setup and testing.
- Crucial Step: Download the Starlink App! Before you do anything else, download the Starlink app to your smartphone (iOS or Android). This app is indispensable for setup, monitoring, troubleshooting, and especially for its vital "Obstruction" tool.
3. Finding Your Dishy's Perfect Spot: The Crucial Step
This is arguably the single most important part of your Starlink installation. Get this wrong, and your internet will be intermittent and frustrating.
- The Unobstructed Sky View Requirement: Dishy needs a completely clear line of sight to a wide cone of the sky. Think of it like this: if you can see it with your naked eye, Dishy needs to see it, too. Trees, chimneys, neighboring buildings, and even utility poles can block the signal.
- Utilize the Starlink App's "Obstruction" Tool: This is your best friend.
- Open the Starlink app and navigate to the "Obstruction" section (often labeled "Check for Obstructions" or similar).
- It will prompt you to scan potential locations by slowly panning your phone across the sky. The app overlays a visual representation of Dishy's required clear sky cone and highlights any obstructions in real-time.
- Use this tool extensively at various potential mounting spots around your property.
- Factors to Consider for Placement:
- Distance from Obstructions: This is the absolute priority. If trees or buildings are blocking the view, you'll need to mount Dishy higher or further away.
- Proximity to a Power Outlet: You'll need an outdoor-rated outlet nearby or a plan to route the cable inside to a power source.
- Cable Length: The standard Starlink cable is 75 feet (23 meters). A 150-foot (46 meter) cable is available as an accessory if you need more reach. Plan your cable route before committing to a location.
- Accessibility for Maintenance: Dishy has a built-in snow heater, but you might occasionally need to access it for cleaning or inspection.
- Physical Security: Consider protecting your equipment from accidental damage or theft.
- Aesthetics (Optional): While not critical for performance, you might prefer a less conspicuous location.
- Common Mounting Options: Starlink offers official mounts, and many third-party solutions exist.
- Basic Base: Included for initial testing on the ground. Not recommended for permanent installation due to vulnerability and potential for obstructions.
- Roof Mounts:
- Pipe Adapter: For existing poles or pipes.
- Ridge Cap Mount, Wall Mount, Flashing Mount: Designed for various roof types. These require careful installation and proper sealing to prevent leaks.
- Pole Mounts: A standalone pole cemented into the ground, often used to gain height above obstructions.
- Non-Penetrating Mounts: For flat roofs, these use concrete blocks as ballast and avoid drilling into the roof membrane.
- Safety First!
- Working on roofs can be dangerous. Use appropriate safety gear (harness, sturdy ladder) and never work alone.
- Be extremely careful around power lines. If in doubt, contact an electrician or power company.
- If you're uncomfortable with heights or complex installations, consider hiring a professional installer.
- Planning Your Cable Path:
- Consider how the cable will enter your home. Common methods include:
- Through a Wall: Requires drilling a hole and careful sealing.
- Through a Window Frame: Flat cable pass-throughs can be used.
- Through a Vent or Existing Opening: Ensure proper sealing.
- Protect the Cable: Route the cable carefully to avoid pinching, crimping, or damage from wind, direct sunlight (use UV-resistant clips), or pests.
4. Mounting Your Starlink Dish
Once you've found the perfect, obstruction-free spot and chosen your mount, it's time to secure Dishy.
- Read Mount-Specific Instructions: Always follow the detailed instructions provided with your chosen Starlink mount.
- General Mounting Process:
- For the Basic Base (Testing): Simply unfold the legs and place Dishy on a stable, flat surface in your chosen clear-sky location.
- For Roof/Pole Mounts:
- Securely attach the mount. For roof mounts, fasten it to roof rafters with appropriate screws/bolts and use generous amounts of weather-resistant sealant to prevent leaks.
- For pole mounts, dig a deep hole, cement the pole in place, and ensure it's perfectly vertical.
- Ensure the mount is incredibly stable and robust.
- Insert Dishy: Slide Dishy's pole into the mounting pipe until it clicks securely into place. Dishy will automatically begin to orient itself once powered on.
- Connecting the Cable:
- Route the Cable Carefully: Run the long black cable from Dishy to your intended indoor router location.
- Protect the Cable: Do not bend, pinch, or stretch the cable excessively. Use UV-resistant cable clips on the exterior to secure it neatly.
- Interior Entry: If drilling a hole, drill from the inside out (slightly larger than the cable connector) to avoid splintering the exterior. Seal both sides of the hole thoroughly with high-quality, weather-resistant sealant to prevent water, drafts, and pests from entering.
5. Powering Up Your Starlink System
With Dishy mounted and the cable routed, it's time to bring your system to life.
- Indoor Setup:
- Router Placement: Position your Starlink router in a central location within your home for optimal Wi-Fi coverage. Avoid placing it near large metal objects, microwaves, or other electronics that could cause interference. Ensure good ventilation.
- Connecting the Cable: Plug the long black cable from Dishy into the correct port on your Starlink Router. On older systems, this cable would first go to a power supply brick, then to the router.
- Apply Power: Plug the router's power cable into a standard electrical outlet.
- The Power-Up Sequence:
- Indicator Lights: Observe the indicator lights on the router. They will typically flash for a bit, then settle into a solid white or green once it's powered on and ready.
- Dishy's Dance: Dishy will begin its "boot-up dance." It will move, tilt, and rotate as it searches for and locks onto satellites. This can take several minutes and you might hear the motor working.
- Initial Boot-Up & Firmware Updates: Your Starlink system will automatically download and install any necessary firmware updates. It is critical NOT to unplug or power off the system during this process. This can take anywhere from 10 to 30 minutes, or even longer, depending on the update size and your signal strength.
6. Configuring Your Starlink Wi-Fi Network & Beyond
Once Dishy has found its satellites and the system is stable, you're ready to connect your devices.
- Connecting to Starlink Wi-Fi:
- On your smartphone, tablet, or computer, go to your Wi-Fi settings.
- Look for a Wi-Fi network named "STARLINK" (or similar).
- Connect to it. For the very first connection, it may not require a password.
- Using the Starlink App:
- Launch the Starlink app. It should automatically detect your new system.
- Customize Your Wi-Fi: The app will prompt you to change the default Wi-Fi network name (SSID) and set a strong, secure password. Do this immediately. Your devices may briefly disconnect and reconnect after these changes.
- Test Your Connection: Use the built-in speed test within the Starlink app, or use a third-party speed test website (like Speedtest.net).
- Real-World Test: Open a web browser, stream a video, or make a video call to ensure everything is working smoothly.
- Advanced Router Settings (If Needed):
- Bypass Mode: If you prefer to use your own Wi-Fi router or mesh system, you can activate "Bypass Mode" in the Starlink app. This turns off the Starlink router's Wi-Fi functionality. You'll need the optional Starlink Ethernet Adapter to connect your third-party router.
- Mesh Wi-Fi: Starlink offers its own mesh Wi-Fi nodes to extend coverage in larger homes. These are also configured directly through the app.
Common Troubleshooting Tips
Encountering a hiccup? Here are quick fixes for common Starlink issues:
- "Offline" in the App: First, check all cable connections (Dishy to router, router to power). Ensure the router has power. Then, check the "Obstructions" tab in the app. Finally, consider extreme weather conditions.
- Slow Speeds: Re-check the "Obstructions" tab – this is often the culprit. Run the in-app speed test. Move closer to the router. Check for local Wi-Fi interference.
- Intermittent Connection: Almost always due to obstructions. Re-evaluate Dishy's placement. Inspect the cable for damage. Ensure the router isn't overheating.
- Reboot: Unplug the Starlink router's power for 30 seconds, then plug it back in. This will also reboot Dishy.
- Factory Reset: A last resort, performed via the app. This will erase your custom Wi-Fi settings, requiring you to reconfigure them.
- Customer Support: If all else fails, contact Starlink support through the app. Provide detailed information, screenshots, obstruction maps, and speed test results to help them diagnose the issue.
Essential Starlink Accessories to Consider
To optimize your Starlink experience, you might want to look into these official accessories:
- Starlink Mounts: As discussed, various mounts (pole, wall, flashing) are available in the Starlink online store to suit your specific installation needs.
- Longer Cables: If the standard 75-foot cable isn't enough, a 150-foot option is available.
- Ethernet Adapter: Crucial if you want to connect wired devices (like a PC, gaming console, or your own third-party Wi-Fi router) to the Starlink system, especially if you plan to use Bypass Mode.
- Mesh Wi-Fi Nodes: For extending Wi-Fi coverage throughout larger homes, these integrate seamlessly with your existing Starlink network. Learn more about extending your Starlink Wi-Fi with mesh nodes.
- Travel Case: If you have the Roam (RV) plan, a rugged travel case can protect Dishy when you're on the move.
Embracing the Starlink Advantage
Starlink represents a significant leap forward in global connectivity. By empowering individuals and communities with fast, reliable internet where it was once impossible, it's fueling remote work, enabling online learning, and unlocking endless streaming possibilities. While the initial setup requires attention to detail, especially regarding line of sight, the reward is a robust internet connection that truly transforms the digital landscape for your home. With this guide, you're well-equipped to navigate the Starlink installation process and unlock the full potential of your new high-speed internet.